 |
| Tunnel card |
There are 3 Indian card challenges going on for which I wished to participate but didn't have the time to make 3 cards. After much pondering created a 3 in one card.
I needed to make
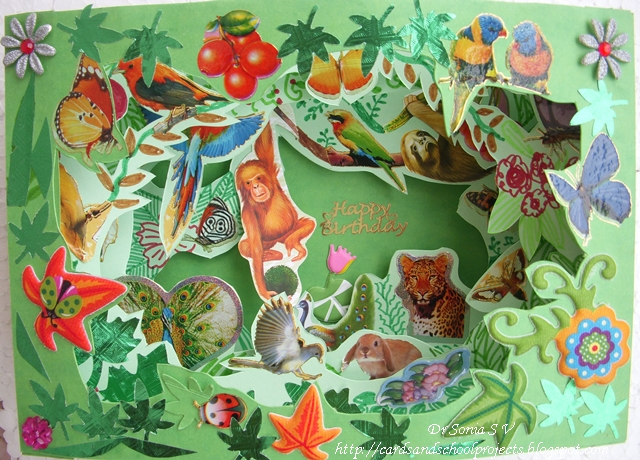
1.A window card with a sentiment for Anita's challenge- Lots of windows in this tunnel card!
2.A card with doodling for the Crafty JC challenge - drawing here is pretty much doodling and I am thrilled to say with a lot of contribution from my daughter .
3.A card inspired by rain for the Indian Craft room Challenge-this is a rain-forest theme card.I had to refresh my memory by researching the fauna and flora of a rain-forest for this card.
Ever since I saw the tunnel book concept I was fascinated. It looks so complicated but is in fact quite easy to make and hence sharing a tutorial.
 |
| Tunnel card |
 |
| Tunnel card |
How to make the tunnel Card [ also called Peep show]
Here I have used an A 4 sized card folded in half and cut for the front panel of the card.You can use whatever size you want.
Make the accordion spine of your tunnel card or tunnel book
- Take fairly sturdy card stock with height equal to the height of the front of the card
- Score lines on the card stock as shown.The score lines should not be too close together as it will be the support for your inner panels. I scored the lines at 2 cm intervals.You can use an embossing tool or a pen which has run out of ink to score the lines.
- Fan fold or accordion fold the score lines. The number of folds you need depends on the number of panels and how much space you wish to give between the panels
- Make 2 similar accordion folded spines
 |
| Tunnel card Tutorial 1 |
Make the panels of the tunnel card
- Make as many panels as you wish.I have 5 panels here.
- You can use card stock which is thinner then the accordion spine if you are not embellishing it heavily.
- The inner panels should be the same height as the front panel and cut slightly shorter in length than the front panel to help easy flat folding of the tunnel card.
 |
| Tunnel card Tutorial 2 |
 |
| Tunnel card Tutorial 3 |
 |
| Tunnel card Tutorial 4 |
 |
| Tunnel card Tutorial 5 |
Here we have filled in the greenery of the rain forest using sketch pens. I would have like to use paint but since it can buckle the panels of the tunnel card had to avoid.
 |
| Tunnel card Tutorial 6 |
 |
| Tunnel card Panel making steps |
 |
| Tunnel card Tutorial 7 |
 |
| Tunnel card Tutorial 8 |
 |
| Tunnel card Tutorial 9 |
Assemble the tunnel card
Stick the panels of the tunnel card to the spine as shown.
Attach all the panels on one side and then start attaching to the other spine. Fold the card flat while attaching to the 2nd spine to ensure that your tunnel card will fold flat and not buckle.
 |
| Tunnel card Tutorial 10 |
 |
| Tunnel card top view |
 |
| Tunnel card close up |
The tunnel card will stand on its own for a stunning display.
I hope you will have fun with this tutorial. You can make a tunnel card of your holiday photos by just cutting out apertures and layering them.You can use it to make a special card or even for a school project.
This is a super fun project for little ones- they can have fun with drawing, painting and using stickers[ mine just loves stickers!!]
This is a super fun project for little ones- they can have fun with drawing, painting and using stickers[ mine just loves stickers!!]

This is awesome.. Lovely work.. Great work by you and your daughter.. :-0
ReplyDeleteCreative pretty creation. Thanks for sharing dear.
ReplyDeletewow u really have put a lot of thought in making this card .love all that doodling that u and your daughter have done,.
ReplyDeleteGreat tutorial, Sonia! It is look beautiful.
ReplyDeleteOMGoodness Sonia, your tunnel card is FABULOUS! You did such a wonderful job with your card creation. TFS! ~Shen
ReplyDeletesoooooooooooooooo cute ........
ReplyDeleteits for your daughter.....she in the lill pic looking sooooooooooo cute n sweet.......also the card is cute but not more than ur daughter
that card came out really great. Love it
ReplyDeleteBeautiful work...all the hardwork put in shows the beautiful outcome
ReplyDeleteAwesome!! I just love your card! How cool is that your daughter is so talented like her mother!! I just love it when kids love to craft! I also love it when an adult will take the time to craft with their child! Great job to you both:) I had to copy this one for quick tutorial reference! Thank you:)
ReplyDelete~Kim
I love the look of your card and hope to be able to make one as wonderful! Thanks for the tutorial.
ReplyDeleteWhat a great idea, and a great card! TFS! :)Amy
ReplyDeleteКакая яркая и сочная открытка! Классно получилось! Спасибо за урок!!!
ReplyDeletefabulous creation
ReplyDeleteanandhirajan
What a wonderful creation! It is great that you were able to share the fun with your daughter. Thanks for the tutorial.
ReplyDeleteKelly
http://kellyscraftylife.blogspot.com
This is sheer awesomeness... So much efforts you have put it... I have never seen anything like this before...
ReplyDeleteYou are one dedicated sincere crafter... so is your doughter..
I will try to make one like this... lovely Sonia...
Love n wishes...
Priya
http://priya-n-papers.blogspot.com/
Dr Sonia your card is awesome! Thanks for the great tutorial!
ReplyDeleteAwsome card, it's great that you and your Daughter worked on it together, what a special time spent!!!
ReplyDeletePaula
Wow..Its awesome...U r really lucky Sonia, a great supporter with u..right..? gve my love to ur sweeety...
ReplyDeleteYou continue to amaze me with your creations! With you working also, how do you find time to do such awesome craft?!?! Hats off to you Doc!
ReplyDeleteWill def give it a go with my kids. Sure they will love it! And a BIG hug to your little Prisha! She did super! :)
Very clever, and a beautiful result.
ReplyDeleteI just discovered your blog. I am from America and when I saw your comment on another blog I decided to check out crafting styles in India. I am so glad I did. You have many new things to explore here! I am so amazed at this tunnel card. It totally blows me away. Awesome.
ReplyDeleteThe doodling is the very best. Your little one is very talented. So glad you showcased her.
Linda C - turtleinthesand.blogspot.com
oh my god! this is too good! how do you manage!
ReplyDeleteFabulous card and so love the vibrancy of it.
ReplyDeleteI can see why your daughter was so proud of her work. What a fantastic, rain forest. This tunnel card looks as if it took a while, as well as the tutorial. Good job, for sure.
ReplyDeleteI know when I visit you that I will see an amazing project, but I am still absolutely amazed every single time! WOW, this card is stunning! I don't think I've ever seen anything quite like this - is so fabulous! I am going to print out your instructions (thank you for providing them) so I can make a tunnel card in the near future! You are amazing! LOVE, LOVE, LOVE it!! :D
ReplyDeleteLisa
http://indymermaid.blogspot.com
WOW.....you are amazing at creating cards, I love this idea, its fabulous. Thankyou so much for the tutorial too! I really enjoy visiting and seeing your works of art!
ReplyDeleteWow.....what a great card....so colorful. ! Your daughter is rightly stepping into her mom's shoes.. :) Thanks a lot for sharing the tutorial !
ReplyDeleteAmazing!! You're talented, that's for sure...and your daughter too!! what a way to bond with your child..simply amazing!! hats off to you!
ReplyDeleteOh Wow! This is AMAZING! Thank you so much for providing the tutorial! Your little assistant did a fantastic job too! Mine are sitting here enjoying this card so much that it is now on the top of our summer to do list! They send their hello to their crafty friend!
ReplyDeleteThis is amazing. You certainly are talented. :-)
ReplyDeleteThank you so much for stopping by my blog! This card is just AMAZING and so many layers and details, I love this. And what a detailed tutorial, thank you!
ReplyDelete-rwk
rwkrafts.blogspot.com
Thank you so much for stopping by my blog! This card is just AMAZING and so many layers and details, I love this. And what a detailed tutorial, thank you!
ReplyDelete-rwk
rwkrafts.blogspot.com
Sonia, you do make the most amazing creations! I love your tutorials, wow!
ReplyDeleteThis is a lovely card and the instructions on how to product it are wonderfully clear.
ReplyDeleteThis card is amazing! Congrats to you and to your talented little girl! You are a great team! And I imagine how much fun and joy was making this together!
ReplyDeleteThe chart was a very creative project, too!
Thanks for sharing your work and for taking the time to make so good tutorials!
Thank You ladies for taking the time to leave me such kind comments. It is so encouraging to read a positive feedback
ReplyDeleteThank you for stopping by...loved ur post and the tutorial. Fun-filled, how cool is that to do with your daughter! I also enjoy my daughter's company during some of my lazy afternoon creations:)
ReplyDeleteHi dear..thanks for leaving a lovely comment on my blog, i am happy to see your work..your blog is amazing,i love your paper creations..super nice stuff..so i am showing love by following your blog..have funnnn
ReplyDeleteLove ~
Very creative, Sonia. You are so talented.
ReplyDeleteThanks for your lovely comments on my blog. If you haven't already, check out this post http://allthingzbeautiful.blogspot.com/2011/03/wrap-me-up-pretty.html for some more gift wraps.
WOW! very creative and thank you for taking the time to give us a tutorial!!
ReplyDeleteHugs
Sonia, this card is super WOW!!! Thanks so much for sharing the tutorial. It does seem easier than I had thought it would be. You have captured the essence of the rainforest quite well. And your daughter, only 5? Wow, she deserves a CONGRATULATIONS on phenomenal artistry!
ReplyDeleteI am so glad you received the package! I love to give and the cost was well worth the surprise you shared in the form of a comment at my blog. Tell the husband, WE ARE CRAZY! LOL! :o)
Awesome and pretty .
ReplyDeleteAll the best ,Good Luck in the challenge .
Holy, shamoley!!! That's a beautiful card! I'm now a follower of your glorious blog! Thanks for following me too!
ReplyDeleteI'm from little ole North Carolina!
scrapwithraina.blogspot.com
Amazing Card Dr. Sonia Love it and thanks for the great how to tutorial!
ReplyDeleteWow- I have never seen a tutorial for a card like this before- I love your jungle scene- I would have guessed it would be more difficult! Wonderful!
ReplyDeleteoh my gosh!! thats so pretty.. I've got to share that with my daughter... She'd love to try that out!!
ReplyDeleteI am totally speechless here. The card is brilliant - well beyond brilliant. A budding artist at home huh :) Beautiful doesnt say it well enough. And also a BIG BIG THANKS for the tutorial - awfully sweet of you.
ReplyDeleteThanks for playing at CraftyJC Challenge
This is so cute. I want one!
ReplyDeleteWow! That's so much detailed!! Love it
ReplyDeleteFabulous card! Thanks for joining us for the CES Challenge!
ReplyDeleteJane
x
A really beautiful creation and such amazing attention to detail, great that your daughter got involved too, thank you so much for joining in the fun at CES this week :) Donna x
ReplyDeleteamazing sonia..simply loved it...wish i cud spare so much time n do such lovely work:)
ReplyDeletefab card - saw it on MIM x
ReplyDeleteAnother wonderful card and tutorial too, good luck in the Make It Monday challenge.
ReplyDeleteSandy
Wow! Your work is fabulous!! I came over from Make it Monday... And I've been wandering around your blog for ages!! ;)
ReplyDeleteSuch detailed tutorial .Beautiful project this . Thanks for visiting my blog and the kind words you leave for me .
ReplyDeleteThanks for sharing on Make it Monday .
Wowee Sonia - love your make and tutorial! Thank you for sharing with us at Make It Monday!
ReplyDeleteMary J x
absolutely adorable ..best of all ...you include kids :)
ReplyDeleteКак красиво!!!! очень понравились ваши раблты!
ReplyDeleteits very niceeee.... interesting
ReplyDelete