Hinged Box Tutorial
 |
| Box Tutorial |
Dear friends so sorry I have not been over to your blogs--was suffering from a bad flu! And this is the promised tutorial for the hinged box.
 |
| Box Tutorial |
I love the way the box lid opens in a hinged fashion.Added some quilling and punchcraft flowers to the lid of my hinged box.
 |
| Box Tutorial |
Materials required to make the box
Card stock -not too thick!
Scoring tool -use a bone folder or anything pointed like a blunt knife or a ball point pen which has run out of ink
Score board or scale to measure
Glue- I prefer white glue fevicol MR
Scissors
Sharing the instructions to make a box 3.5 x 3.5 inches and 1 inch in depth.I wanted this dimension to serve as a box for a 3x 3 inch post it note holder.Shall later share the trick to make any sized hinged box!
 |
| Box Tutorial |
Take a 10 x 5.5 inch card.
On the 10 inch long side, score at 1, 4.5,5.5 and 9 inches.If you dont have a score board that will translate to score intervals of 1 inch , 3.5 inches,1 inch and 3.5 inches [leaving 1 inch at the end] to make a 3.5inch wide hinged box.
 |
| Box Tutorial |
Turn the card 90 degree and score at
1 and 4.5.
If you dont have a score board that will translate to score intervals of 1 inch and 3.5 inches [leaving 1 inch at the end] to make a 3.5inch square hinged box.
 |
| Box Tutorial |
Once your lines are scored.Cut on the parts as indicated by the red lines above in the box template
 |
| Box Tutorial |
Valley fold on all the score lines.If you wish for a more polished look for your final box, wedge cut all 6 squares as shown in the box template.
 |
| Box Template |
More modifications[optional]:If you wish to avoid the flappy appearance some hinged box lids have,chop off a triangular wedge from the lid flap as shown in the box template .
 |
| Box Tutorial |
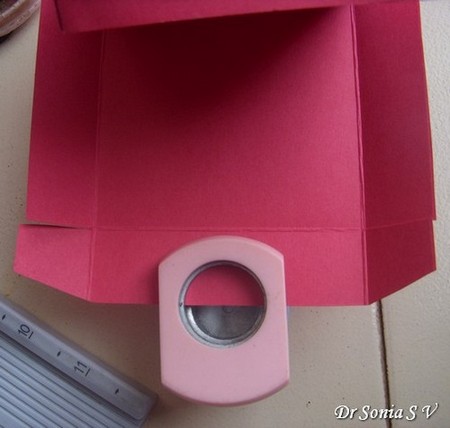
To give the lid a professional look and make it easier to open the box, punch out a semicircle on the center of the lid flap as shown in the box tutorial.
 |
| Box Tutorial |
Apply glue on the outside of the square flaps and glue one by one to make the base, hinge and lid of your hinged box.
 |
| Box Tutorial |
The picture below shows the glue on the square tab of the hinge area of the box.
 |
| Box Tutorial |
Once all tabs are glued in position,you have your basic hinged box.
 |
| Box Tutorial |
To make it easy to open your box and also glamorize it a bit ,stick on the lid and base pieces of card which are slightly larger than your hinged box.
 |
| Box Tutorial |
To make any sized hinged box
 |
| Box Tutorial |
In the box template above ,b and c are how wide and long the final box will be and a is the depth of the box. To calculate what size of card stock required to make a box of desired dimensions
Width of card stock required =2 a + c
Length of card stock required= 3 a + 2 b
So if you want a box measuring 3 inch long x 2inch wide x 1 inch depth ; Width of card required = 2 x 1 +3=5 and Length of card required = 3 x 1+ 2 x 2=7. So using a 5 x 7 inches paper you can make a 3x 2 x 1 hinged box.And if you are with me till now, you can actually use these algebra equations to figure out the dimensions of the box you can make from a given sized paper!
 |
| Box Tutorial |
Dont be daunted by the maths [I dont enjoy maths myself but algebra was always a favorite !] ,this is one of the easiest boxes to make!Do try it!


Amazing I was looking for a gift box supplier for my soap making I think your right up my street, now can you make in bulk ;) xxxxx
ReplyDeleteOh am so glad it was helpful to you. I purposely didnt collage the tutorial photos this time and kept it step by step photo style so that it would help even the non paper crafter make a box easily!
DeleteWhat a beautiful box, and the step-by-step tutorial is so easy to follow. Thank you so much for sharing!!! Love how beautifully you've decorated it!
ReplyDeleteHello Dr Sonia~
ReplyDeleteThanks for being my newest follower, I just became your follower also. I'm here at your blog and I'm dazzled with all your fantastic projects you have going here.. Wow, you are so very much talented... I just love everything that you do.. And you have alot of tutorials thank you so much.. The box above is just so beautiful and that quilling is just so beautiful... I'm glad I found you, I will have to come back and check all your past creations if you don't mind...
TFS and enjoy week - glad you are feeling much better also.
Thank You so much for all the appreciation and encouragement Shirl!
Deleteoh this is fabulous .. wonderful instructions - so easy to follow.
ReplyDeleteI hope you are feeling a lot better
Lisa
ps have you seen this new challenge blog - heckofachallenge.blogspot.co.uk
I hope you feel well again and thanks for the box tutorial.
ReplyDeleteGreetings, Wies
I hope you are feeling better, Sonia. This box is absolutely gorgeous!! And I just love your tutorials...they are so easy to follow and understand!! Thank you so much for sharing your creativity with us!! This is stunning!! Have a great day my friend :)
ReplyDeleteLisa
A Mermaid's Crafts
What a stunning box Sonia I love the quilling its fabulous Well done , thank you for the tutorial. I will be back to look at it again in depth and also at the concertina card below its gorgeous Hugs Elaine
ReplyDeleteWonderful tutorial with pretty flowers. Like the quilling & overall look.
ReplyDeleteMelissa
"Sunshine HoneyBee"
beautiful!
ReplyDeleteI can't believe that you can quill too! What a talented lady you are, my friend! Thanks for sharing another beautiful creation :)
ReplyDeletereally beautiful quilling and thanks for sharing the tutorial here :)
ReplyDeletelove it so much and thanks for playing on BGC
melissa
really beautiful quilling and thanks for sharing the tutorial here :)
ReplyDeletelove it so much and thanks for playing on BGC
melissa
Your box is beautiful and your tutorial so easy to follow. Thanks for sharing it
ReplyDeleteDr Sonia,
ReplyDeleteExplained is so easy. Thanks for sharing the making of this beautiful box.
(It is good to know that you are recovered from the flu. Be welcome).
Hugs.
Okay this is a must tutorial. I love the colors and the top is gorgeous.
ReplyDeleteHugs Nana
♥ My Crafting Channel ♥
Email Me
Awesome box with the pretty quilling and punches. Thanks for the tutorial...it must have taken a while to get it all together and posted. I'm sure it will be put to use by a lot of your fans.
ReplyDeleteSonia
ReplyDeleteSuch a beautiful box. Love the quilling and flowers. Thanks for the great tutorial.
Sorry you have had the flu. Hope all is well now.
I am still not blogging or crafting but maybe when it becomes cooler.
Myrna
Hey nice tutorial Dr. Sonia. I highly appreciate your paitence with such crafts... I kind of get bored with all the accurate markings and folding steps :P
ReplyDeleteHa Ha making boxes is fun and if you have a scoring board its easy peasy!
DeleteThank You dear friends for wishing me good health. I had got a particularly virulent bug and had to take 3 antibiotic courses and numerous other medicines! Shall come around your blogs soon
ReplyDeleteHi Sonia
ReplyDeleteReally nice work! Love how you've embellished it and the diagram provided to make any size hinged box is just stellar. Thanks a lot!
http://itsybitsyindia.blogspot.in/2012/08/emboss-your-card-and-make-it-stand-apart.html
Lovely one.. so good.. you are making full use of your scorpal.. and take care dear.. :)
ReplyDeleteThank You Priya I love my scorepal and I think its one of my most treasured tools!
DeleteBeautiful box Sonia! :) I love the simplicity of it and how clear are your tutorials! I should take a leaf off your book :)
ReplyDeleteHello Dr Sonia. Its very beautiful!! i alwz adore ur innovative ideas:)
ReplyDeleteWow ...what an awesome tutorial and loved the box....I love the way you decorated it too.Your step by step tutorial made it really easy to follow the instructions.Thanks for sharing it on my challenge
ReplyDeleteanother amazingly beautiful example of your quilling Sonia, it's so lovely. Thanks for joining in our paper flower challenge at Unstampabelles this month. you sure are a busy lady.
ReplyDeleteGorgeous box.love the quiling and colors.Beautiful details.
ReplyDeletelovely box dear..love the neat and crisp malaysian flower
ReplyDeletevery nice and interesting tutorial
ReplyDeletemegha
http://www.meghanuj01.blogspot.in/
This box looks fantastic !!Loved your quilled flower and punched blooms ....Thank you so much for the tute!! I just recently made a box similar to yours but I think the dimensions are a bit different ...Will be sharing in my blog soon :)
ReplyDeleteThank you so much for participating in My challenge at Yvonne's blog :):)
Best of Luck !!
super cute!
ReplyDeleteWow,it's a precious box and I love it!Thank you for this tutorial!!!!!
ReplyDeleteI am happy you are better again from this "badluck flu" and I hope the little one didn't get it too! Have a speed recovery and make us happy with your next new creations! hugs,
Thank You dear and yes my little one, my receptionist, the maid all got it but they all got well fast!
DeleteHi! Sonia...so sorry you have been so unwell, hope it has passed now and you feeling better.
ReplyDeleteGorgeous box, I just love the quilling flower, so beautiful, I love the colours and design and a brilliant easy to follow tutorial.. fantastic
Luv CHRISSYxx
what a great case !LOVE THE BOX !thanks for joining us at the BGC !!
ReplyDeletebeautiful box.... fultu professional pics. :)
ReplyDeletethank you for the tutorial............i wanted to make a box for snehal and this post is perfect!!!hope you're better now....tc
ReplyDeleteVery Nice..I love the beautiful & neat look of flowers..Great Sonia..you did great job :) thanks for the detail...
ReplyDeleteDid I ever told you, that I love your ideas?? Thank you for the tutorial!!!
ReplyDeleteFantastic Box Sonia..Loz
ReplyDeleteDr. Sonia!!! This is absolutely gorgeous!!!!!! Thank you so much for the tutorial and I hope you are feeling much better.
ReplyDeleteVery pretty and great tutorial (as always :) Love the quilled flower.
ReplyDeletewow! what a fabulous and awesome box!
ReplyDeletethanx a lot for this wonderful tutorial!
hugs and kisses from germany,
silvi xoxo
Beautiful box and stunning quilling. Sadly not something we see very often in card making :(
ReplyDeleteSuch a pretty box! Love the colors and beautiful quilled flowers! Thank you for joining us at Tuesday Alchemy this week! Good luck! Hugs and sunshine
ReplyDeleteBeautiful box & great tut. Thanks for playing with us at Dream Valley this week x
ReplyDeletewow... the hinged box looks absolutely fantastic... can see the detailing and perfect finish you always give your crafts... Amazing!!
ReplyDeleteHi Sonia, hope your flue is better! Great box tutorial and lovely outcome. Lovely flowers. Thanks for joining in the fun at Unstampabelles Flowers challenge!
ReplyDeleteBeautiful box with a fabulous pictorial. The flowers are gorgeous on the top. Thanks for stopping by!
ReplyDeleteStay Creative,
Georgiana
Carson's Creations
Wow its so pretty interesting. LOve the quilled flower too.
ReplyDeleteSudha
sudha-kalra.blogspot.in
Hi, Dr. Sonia. So happy you are feeling better. Your tutorial is awesome! Very easy to follow. I love tje red box and love how you decorated it. It is always such a treat to visit your blog!
ReplyDeleteGorgeous creation and thank you for the tutorial!
ReplyDeleteThank you for joining us at Tuesday Alchemy!
Hugs Katya x
P.S I am having a blog giveaway at my personal blog, you are very welcome to join
http://madewithlovebykatya.blogspot.ie/2012/07/my-blogs-1st-birthday.html
Your box tutorial is superb and your quilling just perfect. The added butterfly is the icing on the cake. Totally fabulous.! Hugs Mrs A.
ReplyDeleteWOW!! This is awesome!! Great job!! I love all the details that you put into this!! Thanks so much for joining us this week on Tuesday Alchemy!!
ReplyDeleteCheers!
Kelli
Loves Happy Hour
Tuesday Alchemy.
WOW - Another wonderful creation from you - love the quilling on the top. Thanks for joining in our Paper Flower challenge at UnstampaBelles.
ReplyDeletelove the box n the quilling on top..the algebra equation is very useful..i have made few boxes earlier and spended lot of time in calculating the right measurements..thanks for sharing it !!
ReplyDeleteGreat tutorial Sonia!! I sure will try this ones!!
ReplyDeleteSaw your blog on the Outlaws and follow you now :)
sonia this is sooo pretty! thanks for the awesome tutorial.
ReplyDeleteThis is beautiful Sonia, thank you for the tutorial I love boxes and will definitely make this one!
ReplyDeleteI found you on the Outlawz so came over to say hello!
Hugs
Laurian
Thank You Laurian..tried to find your blog but couldnt
Deletegorgeous Sonia, your quilling is amazing!!
ReplyDeleteSonia....the quilled flowers are so lovely and neat and such a wonderful tutorial too. I hope you are feeling much better now. Life has been so busy I am a bit slow with my comments. Thanks so much for joining in our Paper Flower challenge at Unstampabelles.
ReplyDeleteHi Sonia, I found your blog through The Outlawz! Your creations are amazing! I can't wait to see what you come up with for our challenges. I'm also a new follower!
ReplyDeleteBeautiful quilling you added to this gorgeous box Sonia! So glad Teresa sent you our way via The Outlawz ; )
ReplyDeleteHappy Crafting!
This is for you dear sonia...
ReplyDeletehttp://craftoframya.blogspot.in/2012/08/blogger-awards.html
Dear Dr.Sonia, thank u for dropping in & leaving ur comment on my blog....U r an amazing crafter!!!!!
ReplyDeleteLike you even i indulge in quilling to relive myself from the stress i accumulate in the day working on 9to5 job!!!! I have registered to ICR but have not been able to check out the site completely. I would love to take part in the swaps at ICR.....
Quillings yours,
Yulan
www.magikneedlecreations.blogspot.com
Oh no, I hope you are feeling better. Just awful to have the flu!!
ReplyDeleteThe box is beautiful. Love the quilled flower and the colors you chose!! Thanks for the tutorial!
Laurie
serenityscrappers
The quilling on this box just takes it over the top! It's just lovely! You are now on the blog list at The Outlawz, and I will be your newest follower once I finish this comment. I hope to see your smiling face in my followers list soon!
ReplyDeleteIt is beautiful.. thanks for the tutorial Doc :)
ReplyDeleteNidhi
Thanks for the tutorial doctor. Love the quilled flower.
ReplyDeleteI do love paper boxes and yours is wonderful. NancyD
ReplyDeleteFantastic tutorial and quilling job! Great job integrating all of these techniques for our BINGO challenge this week at Tuesday Alchemy!
ReplyDeleteEileen
Awesome!! A very nice tutorial
ReplyDeleteHi Dr Sonia - fantastic box tutorial, as always you make it look so easy :)
ReplyDeleteLovely:)
ReplyDeleteThis is wonderful! Thanks for the tutorial :)
ReplyDeleteyour work is mind-blowing,
ReplyDeletecan u tell me from where i get card stock in bangalore (near BTM)
You can get cardstock from stationary shops. Ask for ivory card stock . I also buy from Raja market
DeleteThis ia a great tutorial, and can be scaled to any dimensions, so thanks for the tip. Love the decoration on the lid :)
ReplyDeleteGreat tutorial and super stunning quill work!! Thanks for joining our challenge over at Unstampabelles!
ReplyDeleteDear, Dr. Sonia..
ReplyDeleteNo comments, what a detailed instructions.. am zapped.. really great..
wonderful...thanks for tutorial.u work inspired me lots.
ReplyDeletewonderful.....thanks for tutorial. ur work inspired me lots.
ReplyDeletemonica
I recently got engaged and wanted to "propose" to my bridesmaids with ring pops. This is perfect for the boxes!
ReplyDeleteThank you
DeleteHi,
ReplyDeleteWhere can i get this kind of Measurement pads?
Its called a scoreboard. The one I have used here is the scorpal. The other popular brand is Martha Stewart scoring board. Online sellers such as crafters corner, the craft shop, Imaginations ,Lulupu etc stock them.Links here :
Deletecraft supply stores
Hello there Dr !!!!!
ReplyDeleteI love your blog an the fact that there r some doctors having this hobby..im studying medicine an my friends always make fun at me for this hobby hehe im rly amazed by u !!
But plz I dont no about quilling an u have lots of projects include this ...if u plz could explain how to makes those beautiful flowers i rly wanna make this project its so awesome an lovely !!!!!!!
THX ALOT !!!!!!!!!!!