 |
| Handmade photoframe |
 |
| Interactive card |
 |
| Interactive window card |
Materials required
This is a super fun and easy card to make.
- Sturdy Card stock: Your card will be subjected to quite a lot of pushing and pulling so good sturdy card stock is a must! You need 2 pieces of same size. I used 2 cards of 6 x 8 inches in this interactive card tutorial
- Something to measure and score : You can use a scale and blunt used pen .I have used a scorpal. This is one card where you need to be accurate to get the fold right!
- To cut a window : Its perhaps easiest to use a Xacto knife to cut out an aperture .I used dies and a big shot[one is obliged to play with new toys!].
- Good strong adhesive : I found white glue[Fevicol MR] the best as it doesnt dry too fast and you can play around with the position of your interactive elements and correctly position the 2 parts of your interactive card.
How to make an Interactive Window Card
Take 2 pieces of same size card stock [mine 8 x 6 inches].Score 2 ends at 1 inch from the edge and then at 1/2 inch from this score line you made as shown.For those with a scorpal this translates to score at 1, 1 1/2,6 1/2 and 7 inch.You can play around with your measurements according to your card dimensions and what depth you want to give the window card.
 |
| Interactive Window Card Tutorial |
Cut out an aperture on one of the card pieces positioning your aperture well within the inner score lines of your window card.
 |
| Interactive Window Card Tutorial |
After cutting the window,valley fold the outer score lines and mountain fold the inner score lines as shown in the interactive card tutorial
 |
| Interactive Window Card Tutorial |
 |
| Interactive Window Card Tutorial |
Build a 3 D or flat scene on the uncut card panel and choose an interactive element.Stick your interactive element on a long piece of sturdy cardstock
 |
| Interactive Window Card Tutorial |
Experiment with the positioning of your interactive element and how it looks through the window of your interactive card.
 |
| Interactive Window Card Tutorial |
 |
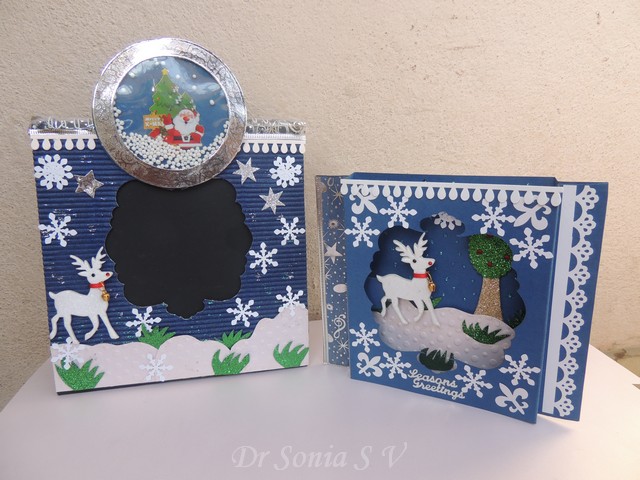
| Interactive Window Card |
Dont add heavy embellishments on the top panel of your window card.
Since I was gifting all the teachers photoframes this year, made a matching photoframe with a an interactive snow globe shaker.
 |
| Interactive Photoframe |
To make a snowglobe shaker you need Card stock, a thick transparency[or acetate], double sided foam tape ,an image[stamp , sticker etc] and a shaker element [you can use beads,sequins or tiny thermocol balls like i did here]
 |
| Snowglobe shaker |
Cut out an aperture from the center of one circle. Cutting out circles is a bit tricky with the xacto knife so you may "cheat" and cut a square!
Cut a transparency slightly larger than the aperture and stick it on the reverse of this window card using double sided foam tape[you can stick it in such a way that it overlaps the transparency and the cardstock]
 |
| Snowglobe shaker card |
Add your shaker element and stick onto the other circle in which you made a snowy scene.[The toughest part for me was to get the thermocol balls to stay in place and not fly all over the room!]
Making the snowglobe was so fun...I confess I will miss playing with it when we gift the snowglobe!
I dont know if this type of interactive card and frame will appeal to an adult but my daughter [just 6 yrs] likes it so much she wants to gift it to her favorite teacher!
Here is the Tutorial to another type of Diorama Card : Easy Diorama Card Tutorial
Supplies : Dies: Couture Creations frame[Itsy Bitsy],Itsy Bitsy Circle,Itsy Bitsy Deckle die,Sizzix scallop oval[Priya]Embossing Folder[Itsy Bitsy],Foam Reindeer[Itsy Bitsy] Punches: Jef Snowflake,Jef Fleur di lis,MS deco Ribbon : Gift from Khalindi.Thermocol balls:Big Market Sahakaranagar[local supermarket]
Edited: This project came Top 3 at BGC

 |
| Snowglobe shaker card |
Here is the Tutorial to another type of Diorama Card : Easy Diorama Card Tutorial
Supplies : Dies: Couture Creations frame[Itsy Bitsy],Itsy Bitsy Circle,Itsy Bitsy Deckle die,Sizzix scallop oval[Priya]Embossing Folder[Itsy Bitsy],Foam Reindeer[Itsy Bitsy] Punches: Jef Snowflake,Jef Fleur di lis,MS deco Ribbon : Gift from Khalindi.Thermocol balls:Big Market Sahakaranagar[local supermarket]
Edited: This project came Top 3 at BGC

that is absolutely wonderful !!
ReplyDeleteI loved the way you have explained the whole process , you are very good @ tutorials :)
Im sure the teacher is going to be wowed with this one !
Thankyou for sharing with us at Beyond Grey Challenges
Thank you Pooja...made it keeping BGC in mind!
Deletewoah!! Dr. sonia, this is amazing!! Thanks for the tutorial. I had trouble making the shaker card but you made it so simple.. :) really appreciate your work and sure your daughter's teacher will love it..:) Thanks again.
ReplyDeleteDeepthi I had trouble controlling my fly away thermocol balls and my dog who goes crazy if he sees anything in the shape of a ball!
DeleteWOW I love these the snowglobe is gorgeous. Caroline xxx
ReplyDeleteyour shaker is really lovely .. and the deer is so cute !
ReplyDeleteAWESOME! Totally love it...the reindeer is so cute..
ReplyDeletehttp://www.kiyomikrafts.com/kiyomi/2008/05/peek-a-boo-card.html
ReplyDeleteNot sure if this is the link you wanted sonia, but I used to love watching Aloha videos...but she went off line about 2009 with illness...but this is the video with the princess and castle.
I love your project, love the images and colours..gorgeous card and snowglobe, there will one very happy teacher.
Luv CHRISSYxx
Chrissy thank you so much for the link...it is the one I am talking about...I didnt even know what she had called it!!
Deletebeautiful and neat..!
ReplyDeleteAs usual a neat project.Loved the interactive window card with the sliding reindeer.I am sure Prisha's teacher will love it.I am definitely going to try this beautiful and fun card soon.Also I have always loved snow globes .they have a festive feel
ReplyDeleteSnehal its my first snowglobe and love it!!
Deleteso Beautiful :) you did great job dear doctor ;) I like the tiny bell(ghungro) you fixed around the deer neck !! cute..
ReplyDeleteThank you Khadija..the bell came with the reindeer but I agree he is adorable!!
Deletewow wow wow,thanks for the tutorial
ReplyDeleteReally very cute project. Thanks for showing how you made it.
ReplyDeleteOh wow!! you have managed to stun us again ...i loved the interactive card and the snowglobe and your tutorial is so well explained...Thank you so much for it!!...would definitely love to try the card :) ...its so beautifully embellished.
ReplyDeleteThank you so much for playing along Crafter's Corner #3 and Best of Luck :)
Hussena you always say the kindest things.Am so glad you dropped by...missed you!
DeleteWow, two projects are just amazing!!! I love the interactive card, you make it look so easy to make!! Just adorable and the frame, unbelievable!! Loving the blues you chose, just perfect!!!
ReplyDeleteLaurie
serenityscrappers
Laurie so glad you liked the blue...my mom also appreciated the color combo though I was a bit unsure about it!!
DeleteWonderful stuff Sonia - so innovative and so creative. The snowglobe is just AWESOME!!! I have a plan for an interactive snow globe but not nearly has interactive as yours. Fantastic stuff!
ReplyDeleteItsyBitsy - The Blog Place
I am so glad you like interactive stuff and also make them Sunehra.It is so thrilling to see them.
DeleteThese are fantastic! Thanks for the tutorials!
ReplyDeleteLove it , Doc...Especially the snowglobe, reindeer and of course ur detailed tute:)
ReplyDeleteI loved the reindeer too Sathya..If Itsy Bitsy was nearer my home I would surely go bankrupt buying all the gorgeous stuff!
DeleteAwesome! Loved the tutorial and the fun scene. Thanks for sharing and playing along here at Loves Rubber Stamps Challenge. Good Luck!
ReplyDeleteHugs, Dangina
Sonia
ReplyDeleteSuch beautiful gifts for the teacher. She will treasure these for sure.
Thank you for the great tutorial.
Myrna
Thank you Myrna...I hope the teacher likes this one as all the other teachers are going to get flowery photoframes!
DeleteGorgeous cards!!! LOVE the all the details you added!!!
ReplyDeleteFAB Christmas cards!!!
TFS
This is just adorable Sonia! Thanks for sharing on the tutorial I will have to give this a try when I have some free time... Love all those embellishes you put on your projects they just make every project pop....
ReplyDeleteYou are so kind Shirl. I did go a bit overboard with the snowflakes in this one!!
DeleteStunning !!!! Gorgeous card
ReplyDeleteHi Sonia
ReplyDeleteWOW, absolutely stunning creations! I made a window card last year so I know how it feels to make one. On the other hand I have not made any shaker cards yet so thank you for the inspiration! Thank you for the tutorial too.
Michaela xx
This is stunning...ur daughter's teachers r going to love these creations of urs.......
ReplyDeleteRumsiha....
gettingcrafty11.blogspot.in
Lovely Sonia.. Awesome tute as usual.. Love,the shaker ball.. V pretty :-)
ReplyDeleteOh Sonia, so gorgeous!!! You are so clever - I love getting inspiration after visiting you!
ReplyDeleteWhat a wonderful gift for the teacher! Both the card and the photo frame took a good deal of time to make--there is so much attention to detail! Love the design of each! :^)
ReplyDeleteHugs, Penny
This is so incredibly adorable! Her Teach will love it! I wish my brain would think like this! Thanks so much for playing along with us at Digi Darla's!!
ReplyDeleteMichele
DDCDT
This is fabulous, Sonia!! Wow, I love it!! The shaker snow globe is gorgeous and I love the scene with the deer!! Absolutely amazing as always!! Thanks for the inspiration!!
ReplyDeleteLisa
A Mermaid's Crafts
Another stunner Sonia - I love the snow globe.
ReplyDeleteThis is fabulous honey... truly gorgeous!
ReplyDeleteThank you so much for sharing your wonderful creations.
Hugs,
Karen.xx
WOW!!Seriously GORGEOUS!!Very Creative!!Love!Love!Love this project!!
ReplyDeleteHave a wonderful day,
Migdalia
Fabulous cards!! Thanks so much for wonderful tutorial. Nicola x
ReplyDeleteSimply stunning ...
ReplyDeleteThe shaker is absolutely adorable ..
Lovely card and box ...
As usual very inspiring :)
Both of these projects are so much fun. I know I would be moving that reindeer backwards and forwards for a while before giving it as a gift. Thanks for sharing this over at Unstampabelles for our Christmas challenge.
ReplyDeleteoh these are fabulous .. i just love all the details, the shaker, the depth to your card .. you are so inventive !
ReplyDeleteLisa x
Oh my, these are just awesome! Great tutorial, too! I especially love the adorable reindeer, he is so cute! Fantastic work! Thankd for joining in at Dream Valley!
ReplyDeletelove Mags B x
Wow this is a fabulous card with tutorial, love all the details on your card are awesome! Thanks for playing with us at Loves Rubberstamps!
ReplyDeletelove the colour combination! and cute santa snow globe!
ReplyDeleteWow, what a fabulous design, I love all the details and elements you put into this card. It's amazing! Thanks for playing with us over at Loves Rubberstamps!!!
ReplyDeleteThese are Stunning Sonia. Thanks for the Tutorial..Loz
ReplyDeleteWow! love your tutorials :-)
ReplyDeleteWow!stunning! As always perfect and inspirational work :))
ReplyDeleteWOW! This is so fab! Love the snowglobe. so easy to make but gives nice effect. You always come up with something new and different! Thanks for inspiring us:)
ReplyDeletesuper duper card and frame .love them
ReplyDeletemegha
http://meghanuj01.blogspot.in/
This is fabulous, loved all the details and the tutorial...I want to try out this...Thank you joining the crafters corner challenge#3
ReplyDeleteHi Sonia,
ReplyDeleteI found your blog accidentally, and I want to say that you tinker very nice things and give great instructions.
This card from you I think that's wonderful. A terrific job
Greetings from the Snowy Germany sends you most sincerely Carmen :)
wow this is such a gorgeous project dear, love the cards, thanks so much for sharing how to do it. loved the embellishments!
ReplyDeleteOh wow, how fun is this! Great tutorial too!! Thanks for sharing and Thanks for joining us at Digi Darla's!
ReplyDeleteThese are wonderful! Both are so beautifully detailed! Love all of the snowflakes and sparkle and the tiny jingle bell around the deers neck! Thank you for the tutorial!
ReplyDeleteHave a Merry Christmas!
Pam
scrap-n-sewgranny.blogspot.com
This is AMAZING!!! I love both of your projects and your tutorial is AWESOME! I will definitely have to try this out! I love that the card scene is interactive - GENIUS! Thank you so much for the instructions and for playing along with us this week at Loves Rubberstamps!
ReplyDeleteOh you have made 2 beautiful projects, love your tutorials as well... thanks for joining the Forever Friends 'Christmas Card' Challenge. Good luck in the draw and hope you will join us for our next challenge. Merry Christmas, Hugs Diane x
ReplyDeletewhat a creativity Sonia...!! Always u r coming with eyecatching pieces...Thank u for all the tutorials dear...
ReplyDeleteI don't have the words to describe how AWESOME these are! Thanks for joining us at Digi Darla Challenges and good luck!
ReplyDeletewow..really have no words..just fabulous..
ReplyDeleteHugs
Sudha
sudha-kalra.blogspot.in
awwww there so adorable !!!!!
ReplyDeletePaula
very pretty!!thanks for sharing!!
ReplyDeleteI making one of them this weekend
ReplyDeletethanks for the tutorial for the rose buds
Wonderful as always Sonia. Thanks for joining in the fun at Unstampabelles this month - hope to see you back!
ReplyDeleteGreat snowglobe :-)
ReplyDeleteHugs, antonella :-)
OMG both the card and the frame are so so amazing, thanks for sharing a great tutorial yet again.love that tiny bell in the reindeer's neck.
ReplyDeletePS:I also dnt have the patience to watch tutorial videos on youtubes, photo tuts are much better.
Thank you Juhi...I love the reindeer...its from Itsy Bitsy
DeleteFabulous card, love the colors and details on your card! Thanks for playing with us at Digi Darla's!
ReplyDeleteHi nice card!! thanx for the nice explination ;)
ReplyDeleteAnd.. thanx for joining the FF challenge!
Linda DTFF
how come you everytime manage to stun us.....u never leave any chance of not doing so...anyways....its just gorseous.....loved the you have written your whole tutorial....thanks for playing with us at crafter corner challenge#3....all the best.
ReplyDeletewww.crafterscorner.in
www.crafterscornerindia.blogspot.in
Oh My such effusive compliments...you have put me on cloud 9 !!
DeleteThis is so fun. You are so creative I love this idea, Have a great weekend., my friend
ReplyDeleteYou could enter this in my DL.ART ANYTHING GOES December Linky Party
DIANA L.
http://dianamlarson.blogspot.com
As always Sonia you have excelled at creating fun and stunningly beautiful projects, Always a pleasure to see your work. Thanks for joining in our challenge at Unstampabelles this month.
ReplyDeleteBeautiful Sonia! Such gorgeous frosty colours too, I love all the glitter and sparkle :D Great tutorial too!
ReplyDeleteThanks for joining our fortnightly challenge at Forever Friends Challenge Blog :)
Tanya xx
ths s pretty pretty soooo pretty....love to keep ths n my crib...
ReplyDeleteOh my goodness, these cards are so creative!! I love that you can interact with them and their great movement. Super creative and great job! Thanks so much for playing at the UnstampaBelles Challenge!
ReplyDeleteBoth of your projects are amazing. Thank you very much for the tutorial on how to make a snowglobe shaker. I will definitely try this one day! :)
ReplyDeleteAlso, thank you for stopping by my blog and leaving me such a nice comment. I really appreciate it.
Hugs! xx
These projects really makes me smile. Such creativity and loads of work and thank you for showing how you made these too. So awsome and they look superb put together as well. Thanks for playing at Incy Wincy and good luck. Hope to see you back monday for a new challenge. Bettina xx
ReplyDeleteWow this is totally fabulous! Just love everything about your cards. Such amazing details.
ReplyDeleteThanks for joining us as Digi Darla’s Challenge this week. Hope to see you again next week. DT Crafting Vicky
Einfach wunderschön was du hier zeigst.
ReplyDeleteLiebe Grüße, Anja
Such a clever idea and thanks for doing a little tutorial too
ReplyDeleteThanks for joining in with our Christmas challenge over at Forever Friends and good luck
Julie x
My blog
Pennys Challenges DT member
Fashionista DT member
Forever Friends DT member
OSAAT DT member
WOW - What a stunning card! thanks for such a great tutorial too ;-) Thanks for joining in our Christmas Challenge at UnstampaBelles this month.
ReplyDeleteThis is really awesome..
ReplyDeleteThe tutorial is really helpful
Thank you so much Nehal
DeleteHow is it a push pull card..?
ReplyDeleteThe little reindeer slides to and fro across the snowy scene on pulling and pushing the side wings of the interactive card.
Delete