Hi friends my daughter graduated from junior school and we made mini books as year end "Thank you" gifts for my daughter's favorite teachers. These minis are just 3.5 x 3.5 inches and hence were quite easy to make and decorate.
Before I share the tutorial here are the details of how this particular mini book's cover looked before it was jazzed up!
Mini Book
For mixed media fans, I had earlier shared how to decorate a book cover here: Mixed Media mini book cover tutorial . Though I loved the pretty floral pattern I used on the cover ,I added a bit of texture using a Memory box stencil and whipped spackle.
Texture Media
Once the whipped spackle dried , I added resin corners and some heat embossed parchment flowers [ made with Heartfelt creations Botanical Wings ] and heat embossed and water-colored leaves [ made with the Winnie and Walter In Bloom Elsa's Flora Stamp Set ]
Mini Book
The butterfly was cut out from a pattern paper sent to me by Mrs A for winning her butterfly Challenge.
Mini Book
The photo below shows how the mini book looks from above with the tags in their pockets.
Mini Book with tags
The mini book has 7 pockets and 4 of the pockets open on top and 3 open to the sides for inserting tags
Mini Book with tags
I first made this type of mini book following Jess' picture tutorial but since many of you got confused with that tutorial link here is my kiddo sharing a short video tutorial on how to make a basic mini book.
And for my readers who like pictorials better here is how to make a mini book in pictures
You can make a Mini Book using these basic materials
One 12 x 12 inch paper
Two 3.5 x 3.5 inch pieces of chipboard/cardboard
Two 5 x 5 inch pattern papers
Mini Book Tutorial
Materials required to make a basic Mini Book
One 12 x 12 inch paper
Optional: Score Board and Scoring Tool . If you dont have one you can simply fold your paper into 4 equal parts .
Score your paper every 3 inches - ie at 3 , 6 and 9 inches
Mini Book Tutorial
Turn 90 degrees and again score at 3, 6 and 9 inches
Mini Book Tutorial
Cut the paper along the score lines- along the red dotted lines as shown...eg the cut along the 3 inch vertical line will reach till the top horizontal score line while the cut along the 6 inch vertical score line will reach till the lower horizontal score line and the last cut along the 9 inch vertical score line will reach till the top horizontal score line --- this makes the paper look like an "M" or a W whichever way you want to look at it!
Mini Book Tutorial
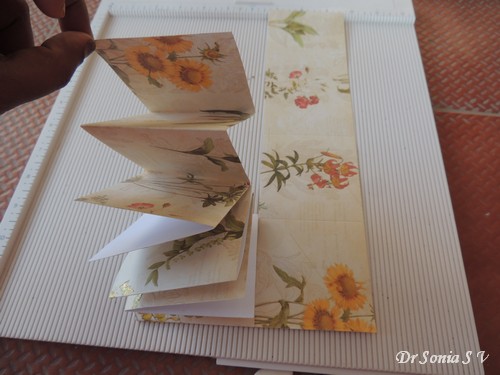
Start accordion folding from one end of the "M"- keeping the first fold a valley fold as shown below
Mini Book Tutorial
Accordion fold the paper using a bone folder or your fingers to get crisp folds.
Mini Book Tutorial
Keep on fan folding at the bottom of the paper - if you keep your folds in the valley- mountain sequence you wont go wrong!
Mini Book Tutorial
So on the 2nd vertical column of the M you fanfold your way up
Mini Book Tutorial
Once you reach the top keep on folding your way down
Mini Book Tutorial
This is how the folds will look as you start folding the 3rd column!
Mini Book Tutorial
Fold your way down the 3rd column .
Mini Book Tutorial
By the time you have reached the end of your 3rd column your book is quite the wiggly caterpillar wanting to spring apart so keep a tight hold on it!
Mini Book Tutorial
And once you have folded your way up the last column your mini book is done!
Mini Book Tutorial
If you want to keep it simple- just stick the blank white pages together and you will have a simple mini book with 16 pages to write on or stick pictures to.
Mini Book Tutorial
Materials Required to make the cover of the Mini Book
Stick the chipboard to the center of your pattern paper.
Mini Book Tutorial
Cut triangles at the corners of your pattern paper flaps [this gives a less bulkier and neater finish] and stick the pattern paper to your chipboard as shown
Mini Book Tutorial
I stuck red tacky tape to around 2.5 inches of ribbon and stuck it firmly to the front page,back page and hinge of my mini. The ribbon adds to the strength of the spine and if you want you can leave the ribbon long to use as a tie closure for your mini.
Mini Book Tutorial
Adhere the mini to the center of the pattern paper covered front and back covers.
Mini Book Tutorial
I used red tacky tape as the adhesive.
Mini Book Tutorial
Though I kept a long ribbon to act as a tie closure for 2 of my first mini books I later found that this was not really required. Here is how the completed mini book looks [yet to add the tags in the pockets]
Mini Book Tutorial
Here is another Mini Book we gifted to my daughter's teacher
Mini Book
I used the super pretty Bob N Betty floral logs pattern paper to make the cover of the mini book .
Mini Book Cover
I used a few resin corners to "frame" my mini!
Mini Book
Added a resin chair with a fluttering butterfly to the rose garden!
Mini Book
Made the heart shaped glass cabochon with scrap pattern papers [again from Bob n Betty]
Supplies:Papers : Bob n Betty Floral Logs, Bob n Betty Ornate Annie , Papericious Bird Song, Papericious the Flora Season Stamps : Heartfelt creations Botanical Wings , Winnie and Walter In Bloom Elsa's Flora Stamp Set Punches : Itsy Bitsy Circular foam punch Dies : Poppy Stamps Pinpoint Main Street Tags , Heartfelt creations Botanical Wings
Linking to Simon Says Monday Pixie's Snippets Playground 224 - used snippets of parchment and paper to make the flowers and leaves on my first mini book and again more snippets of pattern paper to make the glass cabochon embellishment on my 2nd mini book
Wonderful mini book created. The way you embellished the cover is bee-utiful. Hard to believe the size of this since it looks so much bigger with all the wonderful embellishments. I made a small mini book for Easter. Have a BEE-utiful day! Melissa "Sunshine HoneyBee"
Oh my goodness, what stunning minis!! These are amazing, Sonia!! I love how you decorated them!! The papers are so beautiful!! They make such gorgeous gifts!! I know your daughter's teachers loved them!! Thank you for the awesome tutorial, too!! Have a great day my friend!! Big hugs :)
You little mini book is FABULOUS Sonia..beautiful decorated, love the resin corners and that cute chair.You such awesome tutorials, so easy to follow..thank you.
Excellent tutorial by your kid Dr Sonia Thanks for sharing the video. Mini book very easily made and very beautifully decorated .I'm sure the recipients will go head over heels.
Simply fabulous Doc. And I'm awestruck at your daughter's command at this level of creativity..... U definitely inspire me to do the same with my little girl :-D Thanks a lot
Hehe Divya the man of my home my hubby loves flowers and birds and butterflies so never really tried the classical masculine look of gears and cars theme!
Gorgeous mini books! Fantastic tutorial from Prisha, really well explained!! Can't wait for the next instalment of the tutorial for the pockets. Debra x
Gorgeous..!! Loved the beautifully embellished mixed media covers and thanks a lot for the easy to follow tutorial ,will check prisha's video tutorial soon !
Crumbs Sonya! What a fabulous mini book - and how lovely of your to show us just how to do it. I LOVE your daughter's video tutorial :) Talent runs in the family.
Wow, fantastic Sonia!! I'm so glad you shared the tutorial, I had no idea how small the album was!! So gorgeous and such a wonderful project idea!! hugs :)
OMG!!! This is fantastic. You daughter is adorable. I have stamp club this week end and I need a project to show the girls and this is perfect. The mini books are wonderful thank you for sharing the tutorial and the wonderful video. Pat
Beautiful mini book! So many gorgeous details to a mini piece, especially the resin embellishments and flowers are very pretty. Thanks for the step by step tutorial. Hi Prisha, the video tutorial is awesome, thanks for sharing the making! Lots of love :)
Beautiful mini book Sonia!! Such an easy to follow tutorial!! I'm sure the teachers loved them!! The embellishments are awesome!! -Berina Moxie Craftie
Gorgeous mini book! This style is so elegant, I love your tutorial!! Thanks so much to sharing with us this week on Simon Says Monday Challenge Blog! Barbara


Wow! These are beautiful!
ReplyDeleteSuch lovely gifts, too!
Gorgeous mini book project, beautiful papers and brilliant techniques. Love the vellum flowers and details x
ReplyDeleteFabulous mini books!! Love the chabby style and all the gorgous embellishments!
ReplyDeleteSo beautiful! The teachers are lucky as these are so very precious Karen x
ReplyDeleteWonderful mini book created. The way you embellished the cover is bee-utiful. Hard to believe the size of this since it looks so much bigger with all the wonderful embellishments. I made a small mini book for Easter. Have a BEE-utiful day!
ReplyDeleteMelissa
"Sunshine HoneyBee"
Absolutely amazing I love everything about it the colour and the flowers are gorgeous and the overall design is wonderful.
ReplyDeleteDebs xx
{Debs Cards}
Oh my goodness, what stunning minis!! These are amazing, Sonia!! I love how you decorated them!! The papers are so beautiful!! They make such gorgeous gifts!! I know your daughter's teachers loved them!! Thank you for the awesome tutorial, too!! Have a great day my friend!! Big hugs :)
ReplyDeleteLisa
A Mermaid's Crafts
This is stunning, thank you for the amazing tutorial, I'm going to make one of these for my daughter and myself. hugs, Lori m
ReplyDeleteThis is fabulous! Thanks for the step by step!!!!!!!!!!!!!!!!!
ReplyDeleteYou little mini book is FABULOUS Sonia..beautiful decorated, love the resin corners and that cute chair.You such awesome tutorials, so easy to follow..thank you.
ReplyDeleteluv CHRISSYxx
Excellent tutorial by your kid Dr Sonia Thanks for sharing the video.
ReplyDeleteMini book very easily made and very beautifully decorated .I'm sure the recipients will go head over heels.
Thank you for the wonderful tutorial. Your little crafter has become an expert in offering video tutorials.
ReplyDeleteas usual beautifully explained dear. thanks for sharing
ReplyDeleteThis is absolutely breath taking and your tutorial is great.
ReplyDeleteMyrna
Thats a wonderful creation and lovely tutorial ! good to see you try your hands on these mini albums !
ReplyDeleteLovely lovely lovely... !!
ReplyDeleteBeautiful mini album and thanks for sharing tutorial. You put everything in details which is easy to understand and apply.
ReplyDeleteLovely tutorial..
ReplyDeleteSimply fabulous Doc.
ReplyDeleteAnd I'm awestruck at your daughter's command at this level of creativity..... U definitely inspire me to do the same with my little girl :-D
Thanks a lot
Wow...that's very pretty... Loved your daughters tutorial...she is to good n well trained..love n hugs to her
ReplyDeleteDaksha
Amazing tutorial and your dother is so adorable and it is so great to folow her, must try one album to make :)
ReplyDelete♥Hugs Valentina♥
Lovely!! Sonia, I have a request, do share with us ideas to make unisex or mini books for men as well
ReplyDeleteHehe Divya the man of my home my hubby loves flowers and birds and butterflies so never really tried the classical masculine look of gears and cars theme!
DeleteGorgeous mini books! Fantastic tutorial from Prisha, really well explained!! Can't wait for the next instalment of the tutorial for the pockets. Debra x
ReplyDeletelovely
ReplyDeleteThis is just so lovely ! Thank you so much for this clear tutorial !
ReplyDeleteGreetz
Margo
Gorgeous..!! Loved the beautifully embellished mixed media covers and thanks a lot for the easy to follow tutorial ,will check prisha's video tutorial soon !
ReplyDeleteJust watched Prisha's video tutorial ! Enjoyed it thoroughly.. Prisha's seemed so natural all the time I was watching her more than the paper ;)!
DeleteYou have created a real keepsake for your daughters teacher Sonia, I sure she will treasure it.
ReplyDeleteB x
Its a beautiful creation ... Love to visit your blog and creations.
ReplyDeleteMini book is so beautiful...Thanks for sharing the tutorial Dr.Sonia and Prisha..
ReplyDeleteWhat a beautiful Keep sake! Very pretty!! :)
ReplyDeleteSuchi xx
Sonia this is awesome. And thankyou so much for showing so many photos!!
ReplyDeleteLia xx
Crumbs Sonya! What a fabulous mini book - and how lovely of your to show us just how to do it. I LOVE your daughter's video tutorial :) Talent runs in the family.
ReplyDeleteGreat to see you in the Playground.
Hugs
Di xx
Beautiful!! I'm sure the teachers will treasure their handmade gift.
ReplyDeleteWow, fantastic Sonia!! I'm so glad you shared the tutorial, I had no idea how small the album was!! So gorgeous and such a wonderful project idea!! hugs :)
ReplyDeletehey Doc !! very pretty projects i wonder how u manage so much!!!
ReplyDeleteBeautiful mini books and thank you for such a clear tutorial, fabulous! Cara x
ReplyDeleteWhat a beautiful mini book! Your detailed instructions and fabulous!
ReplyDeletePam
scrap-n-sewgranny.blogspot.com
Wonderful mini books! And thank you for the tutorial.
ReplyDeleteWies
OMG!!! This is fantastic. You daughter is adorable. I have stamp club this week end and I need a project to show the girls and this is perfect. The mini books are wonderful thank you for sharing the tutorial and the wonderful video.
ReplyDeletePat
Pat I will publish the 2nd part today or tomorrow- will show how to make the the pockets
DeleteWhat pretty books those are. They look like they would be fun to make too. Thanks for the tutorial
ReplyDeleteits so pretty!
ReplyDeletelove your all creations!
Bad Kitty's Craftroom
amazing mini books and thank you for such a great tutorial.
ReplyDeleteFantastic mini book and great tutorial Sonia..Loz
ReplyDeleteAbsolutely beautiful work Sonia and a great photographic tutorial. I really love your parchment flowers. Barbxx
ReplyDeleteThey are gorgeous, so pretty, xxx
ReplyDeleteIt's stunning! And it does not seems to be too difficult to make. Thank you for tutorial, Dr Sonia!
ReplyDeleteWarm greetings!
Aneta
beautiful mini book love it. hugs
ReplyDeleteBeautiful mini book! So many gorgeous details to a mini piece, especially the resin embellishments and flowers are very pretty. Thanks for the step by step tutorial.
ReplyDeleteHi Prisha, the video tutorial is awesome, thanks for sharing the making! Lots of love :)
Wow! What beautiful keepsakes for your daughters teachers. Fantastic technique with the whipped spackle and a great tutorial. Hugs!
ReplyDeleteBeautiful mini book Sonia!! Such an easy to follow tutorial!! I'm sure the teachers loved them!! The embellishments are awesome!!
ReplyDelete-Berina
Moxie Craftie
Gorgeous mini book! This style is so elegant, I love your tutorial!! Thanks so much to sharing with us this week on Simon Says Monday Challenge Blog! Barbara
ReplyDeleteStunning....very elegant! Love your pretty mini album!
ReplyDeletenice post
ReplyDeleteEverything you post makes me smile... thank you for all the great ideas!
ReplyDelete