 |
| No Sew Ribbon Flowers Tutorial |
Nowadays since most of the crafting I do involves my little one who is just 5 I don't like to use a needle and sew. There are many ribbon flower tutorials around but the majority involve sewing. Here we are sharing a recycling project which is so super easy that even a little helper can chip in.This flower was inspired by a post I saw on Fabric Bows and more
 |
| Ribbon Flowers |
Here is what we used to make the No Sew Ribbon Flower
 |
| Easy Ribbon Flower Tutorial |
- Aluminium Foil Box- this particular one was from a takeaway eatery and I had not felt like throwing away! You can use scrunched up silver/aluminium foil too- If its thick variety its better.
- Ribbon
- Glue drops- you can use a glue gun - I don't have one
- Scissors
 |
| Recycled Aluminium Box craft |
Cut out a strip of foil - thickness depends on how strong the foil is- if its the thin variety cut out a wide strip and fold it lengthwise to increase the strength and thickness
 |
| Easy Ribbon Flower Tutorial |
If you want to make a large flower cut out a long strip.You can leave the edges of the aluminium foil strip a little rough as it helps the ribbon to stay snugly in place and not slide all over!
 |
| Easy Ribbon Flower Tutorial |
Start rolling the ribbon around the foil strip from one end overlapping as you roll.Roll the strip tightly and it stays in place fairly well without any glue.
 |
| Easy Ribbon Flower Tutorial |
Here is my little one rolling the ribbon flower and our Cocker spaniel " Goldy" looking on longing to join in the fun.
 |
| Easy Ribbon Flower Tutorial |
Goldy is one curious character and loves to poke his nose in whatever we do.The sad expression here is because we forbade him from "helping"
 |
| Easy No sew Ribbon Flower Tutorial |
Once you reach the end of the strip apply the adhesive of your choice and fold the ribbon over
 |
| Easy Ribbon Flower Tutorial |
I like using Glue drops whenever I work with my daughter as its like a sticker and so easy for her
 |
| Easy Ribbon Flower Tutorial |
Once your Aluminium foil- Ribbon Strip is ready start rolling in a spiral
 |
| Easy Ribbon Flower Tutorial |
Once you reach the end of the ribbon flower spiral again apply the adhesive and stick.
 |
| Easy Ribbon Flower Tutorial |
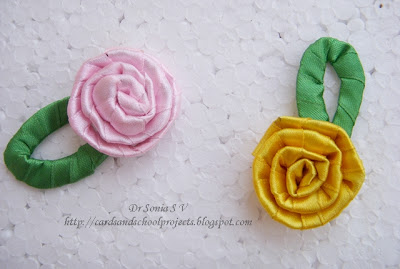
Your Ribbon Rose is ready.
 |
| Ribbon Flower |
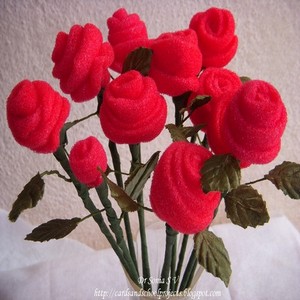
This red one was our first one.
 |
| Ribbon Flower |
Once we made a rose my little one wanted a leaf too!To make the leaf take a short strip of foil- you can use a thinner strip for the leaf
 |
| Ribbon Leaf tutorial |
Roll green ribbon around it.
 |
| Ribbon Leaf tutorial |
Apply your adhesive at the end of the rolled strip
 |
| Ribbon Leaf tutorial |
Bend over the strip in a U shaped manner and your leaf is done
 |
| Ribbon Flower Leaf |
Here is a smaller ribbon rose in my daughter favorite pink color! Do all little girls love pink?!!
 |
| Ribbon Flower |
Then we made one in orange polka dotted ribbon
 |
| Ribbon Flower |
 |
| Ribbon Flower |
The
Aluminium foil spine of these roses makes them
fairly sturdy and they maintain their shape well,are
light weight and
don't crush easily.And if like me you hate to throw away stuff you may be having Aluminium foil strips at home just waiting to be recycled. Do give our ribbon flowers a try!
Please do tell me what you think about this latest project of ours.
Here are links to some more handmade flower tutorials made of unusual materials.
Handmade Rose tutorial -Clay/playdough,Mseal,Marzipan,Styrofoam[Thermocol]


Wow, gorgeous! I've never seen such a thing. Super duper photos too.
ReplyDeleteWow .absolutely fantastic Sonia .
ReplyDeletefabulous idea to recycle aluminium box .all the flowers are pretty.cheers to the little one .thanks for the tutorial .
Wonderful idea, like always! Love these roses! And for sure, all the little girls like pink:)
ReplyDeleteMaybe next time you give a chance to Goldy to be helpful, too:)
What a terrific idea and I will have to try these! Thanks for the tutorial which was very helpful! I just love that you are having your daughter help you/and do crafting- she will remember it always! Makes me miss having young girls as mine are now grown. :)Amy
ReplyDeleteWhat a lovely idea to use aluminium foil as it holds shape so easily! I'm definitely going to try these!
ReplyDeletetions that you have done fantastic, I think it's beautiful shine!
ReplyDeleteGreetings Baukje
Wow, absolutely gorgeous!!! I have always wanted to learn how to do these....you taught me something new today!
ReplyDelete:O)
Jessica
wow super so eaSy an loOks gorgeous
ReplyDeleteIn these daysi am in banglore if there is any bloggers meet or make prog pl inform me
I love them my fave is the orange spotty ones .Iam going to give those a go i think x ps your daughter looks sweet x
ReplyDeleteWOW, Sonia, these flowers are absolutely GORGEOUS! You have made it look easy enough that I am going to give this a try! And oh my gosh, your helpers - your beautiful daughter and beautiful Goldy are so awesome!! Thank you for another fabulous project and tutorial :D
ReplyDeleteLisa
Another beautiful flower! I love it. I have an award for you on my blog. Please stop by to pick it up.
ReplyDeletepixiperfectcreations.blogspot.com
Super fun and easy! Love the polka dot ribbon!
ReplyDeleteThere so pretty,neat mother and daughter creating together!!!
ReplyDeletePaula
Fabulous idea and such cute flowers too. Thanks so much for sharing how you did them
ReplyDeleteSonya, these are just beautiful. I am sitting here with my husband and granddaughter showing them your blog and all the unique things you create. They are amazed as I am. You inspire me. Hugs, my friend, Pam at http://craftycards4u2.blogspot.com/
ReplyDeleteThanks for this ribbon rose tutorial I will show my daughter and congratulations on your blog candy winnings!
ReplyDeleteSuch beautiful flowers!! Love them. Thanks for the tutorial.
ReplyDeletesuch a grt idea,flower looks beautiful:)
ReplyDeletelovely...
ReplyDeletewow such a wonderful idea..! loved the..! thanks for sharing
ReplyDeleteWhat fun you and your little daughter have together. Your flower is sooooo pretty and a great way to recycle. Oh, poor Goldy...you must find a project he can be involved with. LOL
ReplyDeleteThank you for this awesome tutorial, such a great idea! I will definitely try these out sometime. :)
ReplyDeleteAshley
http://especiallymade.blogspot.com
very very pretty !!
ReplyDeletei really like your idea the flowers look so good,i bet my daughter would love to try it out too.thanks for sharing.
ReplyDeleteLovely!!! Thanks for sharing!
ReplyDeleteСпасибо за чудесный рассказ и за отличную идею. Очень умно и красиво.
ReplyDeleteAmazing stuff!!!! will try to make these soon
ReplyDeletewondeerful tutorial... love the idea...
ReplyDeleteLovely. Thanks for the tutorial. Your little girl reminded me of my days as a child crafting with my mum.
ReplyDeleteThis is so clever Doctor, I am impressed.
ReplyDeleteWhat a nice ideea...so many ideeas!!! You are very creative:)
ReplyDeleteMind blowing idea Doc. Thanks for sharing!!!
ReplyDeleteWOW!!! This flowers are just gorgeous and fabulous idea and i will have to give it a try:) Thanks for sharing it with us!
ReplyDeleteHugs
just beautiful,you are an expert in flower making
ReplyDeleteWow! great idea, Roses looks beautiful and thanks for sharing the tutorial!
ReplyDeleteawesome idea!!!
ReplyDeleteWhat a clever idea, they look lovely, thanks for all the pics to show how it's done,
ReplyDeleteSandy
A big hand to you and your little assistant for this one! These are beautiful! I never throw stuff like take-out containers away! My husband doesn't understand it, but I tell him that there is always something it can be used for!! My daughters will love making these! Poor Goldy...hehe! I have a cat that always wants to be a part of our crafty fun! Thanks for sharing this fantastic idea!
ReplyDeleteFANTASTIC... Totally admired this one.. These are the little things we learnt in school and have forgotten over the years.. Added on to the list of summer projects.. with my girls!!
ReplyDeleteThank You so much friends for all the lovely and encouraging comments
ReplyDeleteI am stopping by again to tell you thank you so much for your sweet comment you left me today on my blog. I am always grateful and blessed when I read your words. Thank you so much for visiting me from so far away. It blows my mind to think that I have a friend in India, it's awesome indeed. Hugs, Pam at http://craftycards4u2.blogspot.com/
ReplyDeleteVery Cool flower! Thanks so much for sharing this I will have to show this one to my daughter because she teaches 2nd grade and this would be a fun thing for the kids in class to make:)
ReplyDelete~Kim
I have seen these on cards and wondered how they were made. They look like fun especially when you have the two helpers you have. Thanks for the tutorial.
ReplyDeleteThese are fantastic! I really appreciate the step-by-step photos. This looks like a very fun project. Thanks for sharing.
ReplyDeleteKelly
http://kellyscraftylife.blogspot.com
What a great idea! You are so lucky that she enjoys crafting and creating with you!! Hugs, antonella :-)
ReplyDeletecool idea...even grt for kids to try. thanks for tutorial otherwise i culdnt knw how u did it:)
ReplyDeleteWow this is so neat! I am definitely going to have to try these... Great explanations and photos too! :)
ReplyDeleteAmy
This is a very cool technique. I have never heard of it before. Thanks so much for sharing. Hope Goldie enjoyed watching...LOL.
ReplyDeleteJani
Очень оригинально! Какая интересная идея! Спасибо за урок!!!
ReplyDeleteExcellent. Amazing way of making ring from aluminium...
ReplyDeleteWhat an awesome idea....the roses look great......thank for the tutorial.
ReplyDeleteThanks for visiting my blog and hope you enjoyed my creations.This flower tutorial is so cute and easy.. I am sure to try this out pretty soon.Thx for sharing!
ReplyDeleteThanks for sharing the tutorial... and the pics of your dog and little princess are delightful as well.
ReplyDeletexxx Monica
Wow!! That's such a creative idea! I love recycled crafts :) Will give it a try soon!
ReplyDeleteSuch a simple tutorial yet the project looks like it must have taken forever to complete...love it!
ReplyDeleteThanks for sharing :)
http://www.createmepink.blogspot.com
How ingenious and beautiful! Love them so much! I am going to have to try to make these.
ReplyDeleteBig hugs
Cristi
Very neat idea.
ReplyDeletehttp://lorisartsyobsession.blogspot.com/
Super nice!! this is lovely!! and looks easy to make as well.
ReplyDeleteWill try this :)
ReplyDeleteWow such a great idea! Thanks for the tutorial! I am now a follower!
ReplyDeleteAMAZING!! I am going to definitely try this w/ my girls they are going to LOVE IT! TFS Sonia!!
ReplyDeletedivaof5.blogspot.com
Another great project and tutorial. Thanks so much for sharing. Take care.
ReplyDeletehttp://lorisartsyobsession.blogspot.com/
How cute.. thanks for the tutorial.. i am going to have to give it a try.. thanks for sharing on You Had Me At Craft
ReplyDeleteFrom Sonia to Sonia
ReplyDeleteYou always have wonderfuls ideas... Thanks for sharing this project and tutorial.
-Sony
excellent mam......
ReplyDeleteThank you for the wonderful tutorial! What a great ida. =D
ReplyDeleteNice idea.. The roses look gorgeous. I am planning to do some headband flowers for my friends's little daughter.. I will use this idea and make her a few of these polka dotted roses.
ReplyDeletethank u soo much for leaving those beautiful comments on my blog every time:)u might be thinking y i commented on this post....well this was the post when i first visited your blog & 2 things i like most of yr blog r
ReplyDelete1.i got to see new projects every time i visit your blog
2.your recycled projects r awesome
:)
very nice .. easy n pretty ...
ReplyDeleteSuch a great way to make flowers and use your leftover aluminum box!
ReplyDeleteThanks for joining us at Recycle, Re-Purpose & Re-Invent!
Hugs, Elenor DT
awww.. that's such a cute Doggie :) love your tutorial too.. thank you for sharing :)
ReplyDeleteNeelu
This is amazing recycling and great that you can keep it "safe" for kids! Looks like the dog is helping too LOL!! Thanks for linking up to our REcycle, Re-Purpose & Re-Invent Challenge again!!
ReplyDeleteSonia, this one is great too. Very cool, I have never seen flowers made like this before, it is great recycled project and nice to see your little one involved. Thank you for the how-how to instructions and for playing along in our Anything Goes challenge on Recycle, Re-Purpose & Re-Invent.
ReplyDelete:) Chris / CS Designs
wow..!!! simple n sweet... sure will try this...
ReplyDeleteHi Dr.Sonia, thank u for sharing such a nice tutorial...
ReplyDeleteur works are amazing ...
even in ur busy schedule u r finding enough time for ur hobbies, hats off to u Sonia , keep going...
raji.
hi Sonia, lovely works you have here, i really liked your post on craft supply in India.
ReplyDeleteI too stay in Bangalore.
i wanted to ask you do you know where i can find grosgrain ribbon?
kisses to your little girl
Thank you!! Grosgrain ribbon in particular I dont know..try in some of the shops listed in craft supply stores. Some online sellers too sell ribbons
DeleteTry this link:http://cccraftstore.blogspot.in/2013/01/ribbons-ribbons.html
Deletebeautiful idear Dr.Sonia.
ReplyDeletewonderful !!
Wow dear, super easy n lukin lovely. Keep on posting such more tutorial. Happy crafting.
ReplyDelete