Thank you so much for all the supportive comments on my daughter's video tutorial on creating mini books.
Sharing more mini books we had made to gift my daughter's teachers.
We created the cover and pages of the mini book first as demoed in this Mini Book Tutorial
Mini Book with texture past whipped spackle
I used a Memory Box stencil and texturing media Whipped spackle to create a subtle texture on the cover of the book [ gorgeous papers : Ornate Annie from Bob n Betty].
Added a few of my favorite heat embossed flowers[ Heartfelt creations Sun kissed fleur ] and a few scattered pearls using my favorite new toy the Crystal Katana !
Mini Book Tutorial
I wanted the gorgeous paper to be visible so kept the embellishments minimal with just a pearl mat, a few chipboard hearts and a fuzzy cut butterfly.
Mini Book Tutorial
The hinge of this particular mini book has 2 thin ribbons instead of one broad ribbon I had shown in the Mini Book Tutorial shared earlier.
Mini Book Tutorial
The photo above shows the inside of the book with the pages all fanned out[ papers are from Indian brand Papericious and is from the stack Bird Songs]
In case you missed my daughter's video tutorial on how to make the pages of the Mini Book here it is once again
How to make pockets in your mini book
You can create 7 pockets in your mini book to hold little tags or other knick knacks. Materials required to make a Mini Book with Pockets and Tags
Good Adhesive- use liquid glue or thin red tacky tape.
Circular Punch - if you don't have one don't despair - simply hand-cut a wedge shaped opening instead of the semicircle you can make with a punch
Punches or dies to make tags - again of you don't have the fancy dies to make tags- simple hand cut thick paper into a size that will easily fit into your pockets
Follow the video tutorial shown above or the pictorial shared in my earlier post : Mini Book Tutorial to make an accordion folded mini book
Mini Book Tutorial
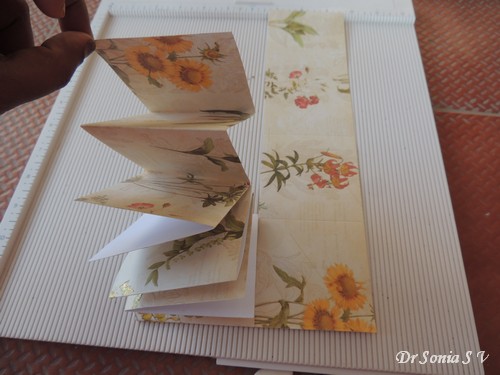
In the picture below the top red arrow shows where you can create your first pocket. It will fall between the 2nd and 3rd pages and you can use it to make a pocket that will open up.
The bottom red arrow shows where you can create your 2nd pocket and it falls between the 4th and 5th pages of your mini book and you can use it to make a pocket that will open towards the side.
Mini Book Tutorial
The picture below shows the 2nd and 3rd pages and how to apply adhesive[I have used thin red tacky tape here] so that you can create a pocket that opens up.
Mini Book Tutorial
I like using red tacky tape as it gives instant adhesion and the adhesion area is predictable unlike wet glue which can seep and involves a bit of waiting and mess!The red arrow in the picture below shows the first pocket created once you adhere the 2nd and 3rd pages along its lower and back borders.
Mini Book Tutorial
The folds of the mini book are such that the pockets will alternate opening up and to the side.
In the picture below the red arrow shows the site where you can create the 2nd pocket- it falls between pages 4 and 5 can be created to open to the side.
Mini Book Tutorial
Apply adhesive as shown in the picture below. Apply wet adhesive or red tacky tape on 2 sides so that the pocket opens to the side.
Mini Book Tutorial
Once you adhere the pages here is how your mini book will look- the first pocket opening up[ [top red arrow] and the 2nd pocket opening towards the side[ side red arrow]
Mini Book Tutorial
Your next pocket [marked as 3rd pocket] will open up and apply adhesive between the pages[ will be between pages 6 and 7] like you did to create the first pocket.
Mini Book Tutorial
Once you have created all the pockets in alternate up and side opening fashion here is how your mini book will look like. The red arrows denote pockets that open up and the blue arrows denote pockets that open to the side.
Mini Book Tutorial
For easy removal of tags which you may want to insert inside the pockets create hand cut wedges or punched semicircles on the pages which form the pockets.
Mini Book Tutorial
Tip : I used to get confused on where to apply adhesive to create the pockets. If you too are getting confused--simply mark with a pencil the sides where you need to put the adhesive ...this makes it quicker and avoids confusion!
Sharing the last of the mini books we gifted my daughter's teachers.
Mini Book Tutorial
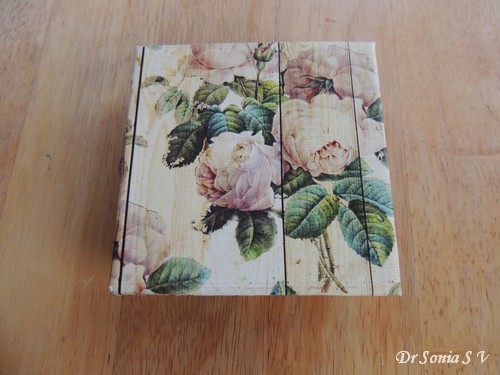
I used the pretty Floral logs from Bob n Betty [an Indian Pattern Paper designer company] and added a parchment butterfly heat embossed in gold
Mini Book Cover
Heat embossed my favorite Heartfelt creations Botanical Wings in copper on parchment paper and added store bought paper flowers to the centers. The leaves [from Winnie and Walter In Bloom Elsa's Flora Stamp Set]were heat embossed in gold and colored with Distress Inks.
Mini Book Tutorial
Here is how the book looks from above with its pockets and tags.
Mini Book Tutorial
And here is the complete set of mini books we gifted to my daughter's 4th standard teachers.
Handmade Mini Books
I hope you enjoyed seeing the mini books and hope the tutorial to create the pockets will be useful.
Hi friends my daughter graduated from junior school and we made mini books as year end "Thank you" gifts for my daughter's favorite teachers. These minis are just 3.5 x 3.5 inches and hence were quite easy to make and decorate.
Before I share the tutorial here are the details of how this particular mini book's cover looked before it was jazzed up!
Mini Book
For mixed media fans, I had earlier shared how to decorate a book cover here: Mixed Media mini book cover tutorial . Though I loved the pretty floral pattern I used on the cover ,I added a bit of texture using a Memory box stencil and whipped spackle.
Texture Media
Once the whipped spackle dried , I added resin corners and some heat embossed parchment flowers [ made with Heartfelt creations Botanical Wings ] and heat embossed and water-colored leaves [ made with the Winnie and Walter In Bloom Elsa's Flora Stamp Set ]
Mini Book
The butterfly was cut out from a pattern paper sent to me by Mrs A for winning her butterfly Challenge.
Mini Book
The photo below shows how the mini book looks from above with the tags in their pockets.
Mini Book with tags
The mini book has 7 pockets and 4 of the pockets open on top and 3 open to the sides for inserting tags
Mini Book with tags
I first made this type of mini book following Jess' picture tutorial but since many of you got confused with that tutorial link here is my kiddo sharing a short video tutorial on how to make a basic mini book.
And for my readers who like pictorials better here is how to make a mini book in pictures
You can make a Mini Book using these basic materials
One 12 x 12 inch paper
Two 3.5 x 3.5 inch pieces of chipboard/cardboard
Two 5 x 5 inch pattern papers
Mini Book Tutorial
Materials required to make a basic Mini Book
One 12 x 12 inch paper
Optional: Score Board and Scoring Tool . If you dont have one you can simply fold your paper into 4 equal parts .
Score your paper every 3 inches - ie at 3 , 6 and 9 inches
Mini Book Tutorial
Turn 90 degrees and again score at 3, 6 and 9 inches
Mini Book Tutorial
Cut the paper along the score lines- along the red dotted lines as shown...eg the cut along the 3 inch vertical line will reach till the top horizontal score line while the cut along the 6 inch vertical score line will reach till the lower horizontal score line and the last cut along the 9 inch vertical score line will reach till the top horizontal score line --- this makes the paper look like an "M" or a W whichever way you want to look at it!
Mini Book Tutorial
Start accordion folding from one end of the "M"- keeping the first fold a valley fold as shown below
Mini Book Tutorial
Accordion fold the paper using a bone folder or your fingers to get crisp folds.
Mini Book Tutorial
Keep on fan folding at the bottom of the paper - if you keep your folds in the valley- mountain sequence you wont go wrong!
Mini Book Tutorial
So on the 2nd vertical column of the M you fanfold your way up
Mini Book Tutorial
Once you reach the top keep on folding your way down
Mini Book Tutorial
This is how the folds will look as you start folding the 3rd column!
Mini Book Tutorial
Fold your way down the 3rd column .
Mini Book Tutorial
By the time you have reached the end of your 3rd column your book is quite the wiggly caterpillar wanting to spring apart so keep a tight hold on it!
Mini Book Tutorial
And once you have folded your way up the last column your mini book is done!
Mini Book Tutorial
If you want to keep it simple- just stick the blank white pages together and you will have a simple mini book with 16 pages to write on or stick pictures to.
Mini Book Tutorial
Materials Required to make the cover of the Mini Book
Stick the chipboard to the center of your pattern paper.
Mini Book Tutorial
Cut triangles at the corners of your pattern paper flaps [this gives a less bulkier and neater finish] and stick the pattern paper to your chipboard as shown
Mini Book Tutorial
I stuck red tacky tape to around 2.5 inches of ribbon and stuck it firmly to the front page,back page and hinge of my mini. The ribbon adds to the strength of the spine and if you want you can leave the ribbon long to use as a tie closure for your mini.
Mini Book Tutorial
Adhere the mini to the center of the pattern paper covered front and back covers.
Mini Book Tutorial
I used red tacky tape as the adhesive.
Mini Book Tutorial
Though I kept a long ribbon to act as a tie closure for 2 of my first mini books I later found that this was not really required. Here is how the completed mini book looks [yet to add the tags in the pockets]
Mini Book Tutorial
Here is another Mini Book we gifted to my daughter's teacher
Mini Book
I used the super pretty Bob N Betty floral logs pattern paper to make the cover of the mini book .
Mini Book Cover
I used a few resin corners to "frame" my mini!
Mini Book
Added a resin chair with a fluttering butterfly to the rose garden!
Mini Book
Made the heart shaped glass cabochon with scrap pattern papers [again from Bob n Betty]
Supplies:Papers : Bob n Betty Floral Logs, Bob n Betty Ornate Annie , Papericious Bird Song, Papericious the Flora Season Stamps : Heartfelt creations Botanical Wings , Winnie and Walter In Bloom Elsa's Flora Stamp Set Punches : Itsy Bitsy Circular foam punch Dies : Poppy Stamps Pinpoint Main Street Tags , Heartfelt creations Botanical Wings
Linking to Simon Says Monday Pixie's Snippets Playground 224 - used snippets of parchment and paper to make the flowers and leaves on my first mini book and again more snippets of pattern paper to make the glass cabochon embellishment on my 2nd mini book